What Is Dev C++?
Dev C++ is a fantastic tool for anyone interested in learning or working with C and C++ programming languages. This free integrated development environment (IDE) provides everything you need to write, compile, and run your programs.
Designed to work on Windows, Dev C++ comes with built-in compilers that transform your code into a language the computer can understand. It’s perfect for creating both Windows and DOS-based applications.
To run Dev C++, your computer should have a Windows 98, NT, or 2000 operating system, at least 32 MB of RAM, a 233 MHz Intel-compatible CPU, and 45 MB of free disk space. What makes Dev C++ especially useful is its support for both C and C++. While C is a straightforward language for sequential programming, C++ adds the power of object-oriented programming (OOP), helping you to manage complex projects more efficiently.
This Dev C++ IDE allows you to compile and run programs written in both languages.
Dev C++ – Key Takeaways
- Understanding the concept of Dev C++.
- Getting insights into Dev C++ Interface.
- Learning environmental settings in Dev C++
- Getting familiar with the step-by-step process of using the Dev C++ compiler.
Dev C++ Interface
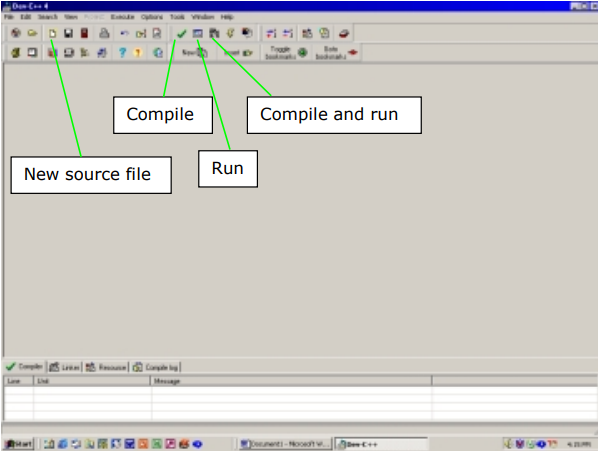
After clicking on the Dev C++ icon, the interface shown below in an image will appear on your screen.

Explore each menu on the menu bar and take a close look at the options available. Notice the icons next to the menu items; these same icons can be found on the toolbar.
At the beginning of this course, you’ll write, compile, and run programs using a single source file. For this, you’ll only need a few buttons or menu options from the toolbar.
Before diving into writing your first C program, we’ll customize some of the environmental settings of the IDE.
Environmental Settings In Dev C++
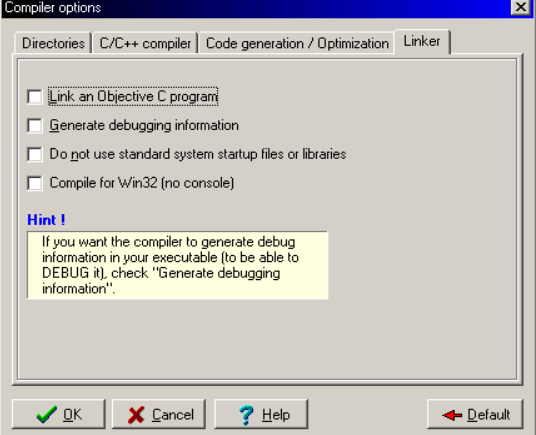
- Go to options, and choose compiler options from the toolbar. The below given interface will appear after this.

Click on the linker tab available on the top and make sure to uncheck all the boxes given in that.
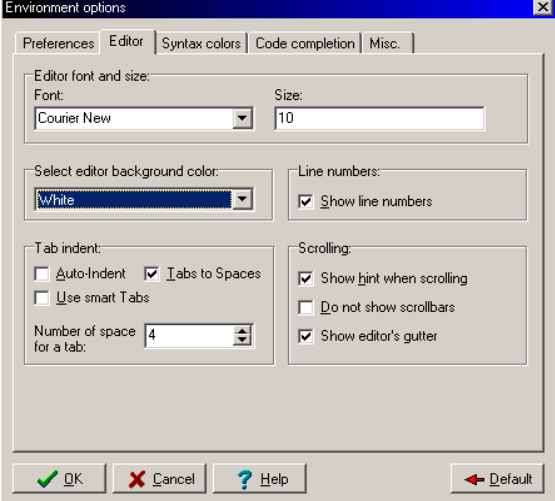
- Go to the Menu bar click on Options and then Environment Options. In the dialog box that appears, select Editor. Customize the background color to your preference. Set the font to “Courier New” and the size to 10. Ensure “Line Numbers” is checked. Uncheck both “Auto-Indent” and “Use smart Tabs.” Check “Tabs to Spaces” and enter 4 in the “Number of spaces for a tab” box. The dialog box should now resemble the figure given below.

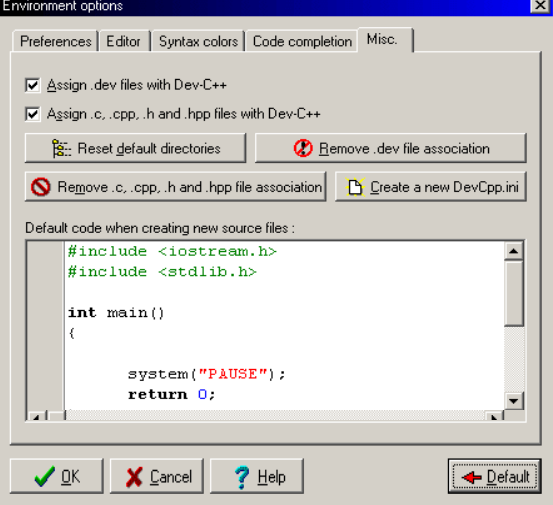
- Now, after updating the editor tab your last updating should include the Misc tab.

Clicking on the Misc Tab will open the above-shown interface on the screen, make sure to check both the options displayed on the top of the screen as it will allow files with different extensions to run on your Dev C++.
Step By Step Process Of Using Dev C++ Compiler
We have written below the step-by-step process of using Dev C++ compiler, starting from the installation to making projects. By following these steps, you can efficiently use Dev C++ to create, write, compile, run, and debug your C and C++ programs, whether you’re working on simple scripts or complex projects these steps will help you do all the things efficiently.
1. Download and Install Dev C++
The first step to using Dev C++ is to download and install it on your computer. You can find the installation file on the official website or a trusted source. Once you have downloaded the installer, run it and follow the on-screen instructions. The installation process is straightforward, guiding you through the necessary steps to set up Dev C++ on your system. After the installation is complete, you’ll be ready to start using the IDE for your programming projects.
2. Open Dev-C++
After installing Dev C++, open the program by double-clicking the shortcut on your desktop or selecting it from the Start menu. When Dev C++ launches, you’ll see its main interface, which includes the menu bar, toolbar, and editor area. This is where you’ll write, edit, and manage your programs. Familiarize yourself with the layout and options available in the IDE to make the most of its features.
3. Configure Environment Options
To transform Dev C++ according to your preferences, you can adjust the environment settings. Click on Tools in the menu bar and then select Editor Options. A dialog box will appear where you can customize various settings.
For example, you can change the font style, font size, background color, and can also enable line numbers for easier navigation. Additionally, uncheck “Auto-Indent” and “Use smart Tabs,” and check “Tabs to Spaces,” setting the number of spaces for a tab to 4. These settings can make coding more comfortable and organized.
4. Create a New Source File
To start a new programming project, create a new source file in Dev C++.
Click on File in the menu bar, then select New, and choose Source File. This action opens a new text editor window where you can write your code. The editor is designed to help you write and organize your program efficiently, with syntax highlighting and other useful features.
5. Write Your Program
In the new source file, type your C or C++ code. For instance, you might start with a simple program to print “Hello, My name is Sahil!” on the screen. Here’s an example of a basic C program:
| #include <stdio.h>
#include <conio.h> int main() { printf(“Hello, My Name Is Sahil!\n”); return 0; } |
Writing your code in Dev C++ is straightforward, thanks to its user-friendly editor. Take your time to ensure your code is correct and well-organized.
6. Save Your Source File
After writing your code, save the file to avoid losing your work. Click on File in the menu bar, then select Save As. Choose a location on your computer to save the file, give it a meaningful name, and use the appropriate file extension e.g., ‘.c’ for C programs or ‘.cpp’ for C++ programs. Saving your work regularly is a good habit to prevent data loss.
7. Compile Your Program
To convert your written code into an executable program, you need to compile it. Click on Execute in the menu bar, then select Compile or press F9. The compiler will check your code for errors and, if none are found, generate an executable file. A message window will display the compilation status, letting you know if the process was successful or if there are any errors that need fixing.
8. Run Your Program
Once your code is compiled without errors, you can run the program to see it in action. Click on Execute in the menu bar, then select Run or press Ctrl+F10. A console window will open, displaying the output of your program. For the example running the above-written code, you should see “Hello, My Name Is Sahil!” printed on the screen. Running your program allows you to test its functionality and ensure it works as intended.
9. Debugging Your Program
If your program has errors or bugs, Dev C++ provides debugging tools to help you identify and fix them.
Set breakpoints by clicking on the left margin next to the line number where you want the program to pause. Then, click on Debug in the menu bar and select Start/Continue to run the program step-by-step. This process lets you inspect variables and follow the program’s flow, making it easier to find and correct issues.
Learn Dev C++ With PW Skills
Join our Comprehensive PW Skills C++ with DSA Course and dive into the exciting world of programming! Learn all about C++, Data Structures Algorithms, and the various IDE used to run C++ with our expert-led program. You’ll work on real-time projects, take self-assessments, complete quizzes and exercises, and earn a certificate upon course completion.
Our course offers comprehensive support, including frequent doubt-solving sessions and 100% placement assistance. We’re here to guide you every step of the way.
Enroll now and kickstart your programming journey today!
Dev C++ FAQs
What is Dev-C++?
Dev C++ is a free integrated development environment (IDE) for programming in C and C++. It provides tools for writing, compiling, and debugging code in these languages.
Is Dev C++ free to use?
Yes, Dev C++ is completely free to download and use. There are no hidden charges or subscription fees.
Which operating systems does Dev C++ support?
Dev C++ primarily supports Windows operating systems, including Windows 98, NT, 2000, XP, Vista, 7, 8, and 10.
Can I write and compile programs in languages other than C and C++ in Dev C++?
While Dev C++ is primarily designed for C and C++ programming, you can also write and compile programs in other languages, as long as there's support for them through external tools or plugins.
How do I compile my code in Dev C++?
To compile your code, simply click on the "Execute" menu and select "Compile" or press F9. This action will check your code for errors and generate an executable file if there are no issues.

