Are you eager to dive into the world of C++ programming but don’t know how to install C Dev C++? Don’t worry, Our detailed C Dev C++ installation guide” is here to help you! This comprehensive guide will take you through the simple steps to install and set up your C++ development environment, making the process smooth and stress-free.
Whether you’re a beginner looking to write your first code or an experienced programmer setting up a new system, this guide is designed to provide you with installation insights in a simple and easy-to-follow way. Let’s read the article further follow each step carefully and you’ll be ready to start coding in no time.
Features Of C Dev C++
C Dev C++ is a popular and user-friendly Integrated Development Environment (IDE) for C and C++ programming. Here are some key features that make it a great choice for both beginners and experienced programmers:
- Free and Open Source: C Dev C++ is completely free to use, and its source code is available to the public. This means anyone can download, use, and even modify it according to their needs.
- User-Friendly Interface: The interface of this IDE is clean and easy to navigate, making it simple for beginners to start coding without feeling confused.
- Integrated Compiler: C Dev C++ comes with a built-in compiler, which means you can write, compile, and execute your code all within the same application. This makes the coding process easy and fast.
- Code Completion: This feature helps in speeding up the coding by suggesting possible code completions as you type. It reduces errors and helps you learn the correct syntax.
- Debugging Tools: Dev C++ includes debugging tools that allow you to find and fix errors in your code. You can set breakpoints, step through your code, and inspect variables to understand what’s happening in your program.
- Project Management: Using this IDE, you can organize your multiple code files into projects, making it easier to manage larger programs and keep everything organized.
- Customizable Editor: The text editor in C Dev C++ can be customized to suit your preferences. You can change the font, color scheme, and other settings to make coding more comfortable.
- Library Support: You can easily add multiple libraries to your projects, expanding the functionality of your programs. This is useful for including advanced features and tools into your code.
These 8 Key features make C Dev C++ a powerful and accessible tool for anyone looking to learn or improve their C and C++ programming skills.
How To Download C Dev C++
After understanding all the key features of Dev C++ let us move forward toward the basic steps that will help you to download the Dev C++ IDE from its official site.
Step 1- Open Official Website
To start downloading C Dev C++ IDE on your PC, Open your web browser and type “Bloodshot.net” into the search bar. This site is the trusted source for downloading the latest version of Dev C++. Ensure you’re on the correct site to avoid downloading any malicious software. Once the website loads, you’ll be ready for the next step in the installation process.
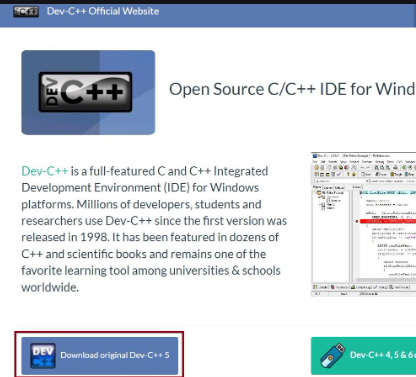
Step 2- Click On The Download Button Shown Below
After opening the official Dev C++ website, look below for the download button. It says “Download Original Dev-C++ 5”. Click on this button to start the download process. This action will basically ask you to save a file and the Dev C++ installer will begin downloading to your PC. After downloading, the basic setup of an IDE will be stored at your default download location.
Installing C Dev C++
Once the IDE setup is downloaded into your PC, we can install the Dev-C++ following the below-written steps.
Step 1: Locate the Downloaded Setup File
Find the Dev-C++ setup file in your computer’s download folder or the location where you saved it. The file name will usually include “Dev-C++” and the version number.
Step 2: Run the Setup File
Double-click on the setup file to run it. A window will appear, asking you to start the installation process.
Step 3: Follow the Installation Wizard
An installation wizard will guide you through the setup process. Click “Next” to proceed. Read through the license agreement and click “I Agree” if you accept the terms.
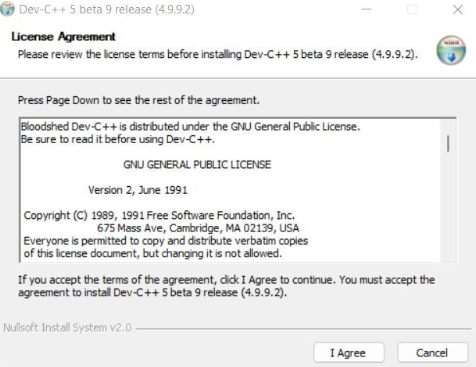
Step 4: Choose the Components To Be Installed
After accepting the license agreement, the second interface will appear where you can choose the components that you want to install in your PC by simply clicking on the check boxes.
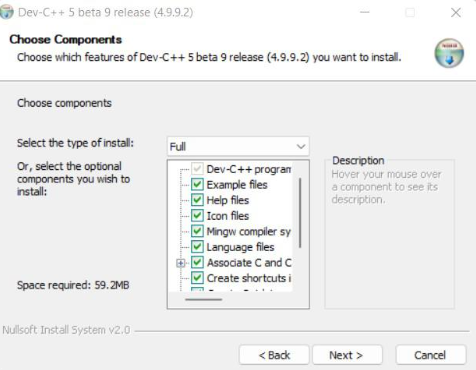
Step 5: Choose the Installation Location
You will be asked to select a destination folder for the installation. You can use the default location or choose a different folder by clicking “Browse.” Once you’ve selected the location, click “Next.”
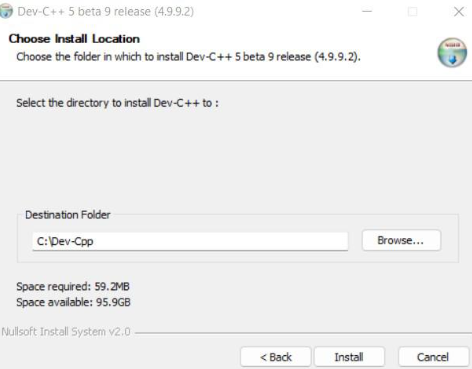
Step 6: Select Libraries To Install
The setup wizard will now ask you to choose additional libraries to install. You can stick with the default options or customize the installation by selecting different libraries. Click “Next” to continue when you are done with selecting.
Step 7: Complete the Installation
Once the installation is complete, you will see a confirmation message. Click “Finish” to exit the setup wizard. You can now find Dev-C++ in your start menu or desktop, ready for use.
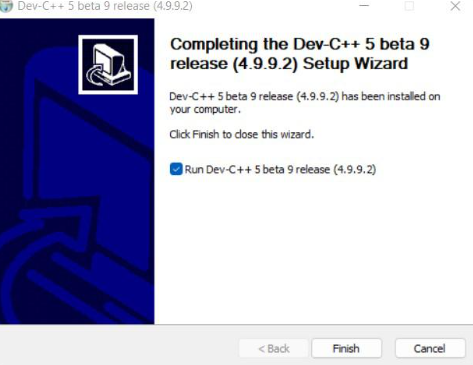
By following these steps, you will have successfully installed Dev-C++ on your PC, and you can begin using it for your C and C++ programming projects.
C Dev C++ Interface
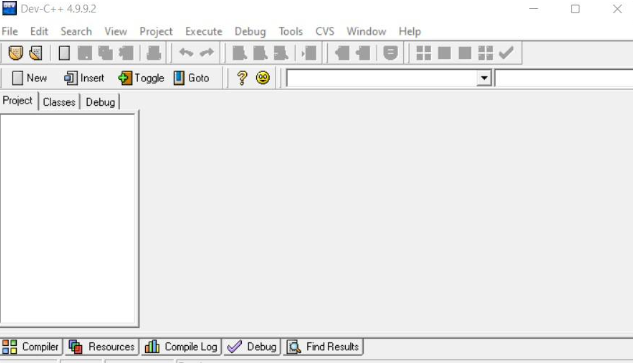
After successfully installing C Dev C++ on your PC, you can double-click on the icon displayed on your desktop to open it. The interface of Dev C++ is designed to be user-friendly and interactive, making it accessible even for beginners.
Upon opening, you’ll find a clean and organized workspace with a menu bar at the top, offering options like File, Edit, Search, and more. Below the menu bar, there are toolbars with shortcuts to commonly used features, such as creating new projects, opening existing files, and saving your work. The main area is the text editor, where you will write your code, and at the bottom, you’ll see a console that displays compilation results, errors, and other messages.
On the left side, there is a project manager panes that helps you organize and navigate through your project files. This well-structured interface ensures that you have all the necessary tools at your fingertips to start coding efficiently.
Learn C++ With PW Skills
Are you an aspiring programmer looking forward to starting your journey in the field of programming? Look nowhere else!
PW Skills provides a comprehensive and detailed course in C++ with DSA covering all the essential topics with the essence of DSA. The key features of this course that make it a standout choice among developers include- Regular doubt clearing sessions, expert mentorship, daily practice sheets, dedicated coding labs, expert support, industry-recognized certifications, and much more.
Join today to get exciting offers and discounts!
C Dev C++ FAQs
Can I use Dev C++ for professional projects?
While Dev C++ is excellent for learning and small to medium-sized projects, professional developers might prefer more advanced IDEs with additional features for larger projects. However, it is still a capable tool for many professional tasks.
How do I install Dev C++ on my PC?
You can install Dev C++ by downloading the setup file from the official website. Once downloaded, run the setup file and follow the installation wizard instructions to complete the installation.
Does Dev C++ come with a compiler?
Yes, Dev C++ comes with an integrated compiler, usually the MinGW compiler. This allows you to compile and run your programs directly within the IDE.

